The bandwidth policy is for reasonable control of network traffic of client machines, to avoid any part of the machines to abuse network resources resulting in network congestion, affecting the normal work across the enterprise, but also can limit the traffic of the specified port to prohibit any download behavior of employees.
As constantly watching over bandwidth of monitored computers, administrators can easily control resources consumption within network, achieving legitimate mobility and fair use of network resources.
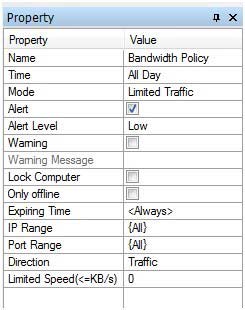
In SurveilStar Console, click menu Advanced > Bandwidth, click Add button to create a bandwidth policy. Then you will see Property panel on the right as the picture below. In the following example, you can see that traffic is limited within all IP addresses and all ports.

Name: Give your bandwidth policy a name like Bandwidth Policy.
Time: Set effective time for your bandwidth policy.
Mode: Select policy execution mode. Unlimited Traffic, Limited Traffic and Ignore modes are available.
Alert: Enable or disable alert. Once IT manager or supervisor logs on SurveilStar Console, he will see the alert and know who has tried to break the bandwidth policy you deploy.
Alert Level: Choose alert level if Alert is enabled. Low, Important and Critical are available.
Warning: Enable or disable Warning.
Warning Message: Set warning message if Warning is enabled. Anyone who breaks the bandwidth policy will see this warning message in monitor's screen center.
Lock Computer: Once this option is checked, the computer of the users who tried to break the bandwidth policy will be locked. IT manager can unlock the computer using menu "Control > Unlock" in SurveilStar Console.
Only offline: Check this option if you want the policy to be effective only when the computers are offline.
Expiring Time: Set expiring time for this bandwidth policy. Or leave it to Always to make it always effective.
IP Range: Set IP address range of the communication computers, which is all by default. You can not only manually add one by one, but also can specify category from the network address classification by {…}.
Port Range: Set port range used in the communication, which is all by default, including TCP port from 0 to 65535 and UDP port from 0 to 65535 and ICMP. You can not only manually add the port or port range individual, but also can specify category from the port classification by {…}.
Enter a specified port should proceeded by "TCP:" or "UDP:" to distinguish TCP port or UDP port, and if not, it will consider to be a TCP port.
Direction:Direction of network traffic when communicate. Traffic from client computers to other machines is defined as sending traffic, on the contrary as receiving traffic.
Limited Speed (<=KB/s): Limit traffic size with KB / s as the unit, which is invalid under the Unlimited Traffic mode.
- - - If Limited Traffic mode is selected, when the speed exceeds the limit set to the client in the specified IP and port range or in the specified direction, the client will pause the download /upload until the average flow rate below a specified value, so as to achieve the purpose of limiting traffic.
- - - If Ignore mode is selected, limiting the speed is invalid until you set the action (alarm, warning or lock computer). When the speed exceeds the limit set to the client in the specified IP and port range or in the specified direction, it will trigger the action set, but will not limit traffic.
This is an example which can help you better understand Bandwidth Policy.
The requirement is that when employee is on work, ftp download is forbidden. To achieve this, you can create a bandwidth policy like below.
1. Create a bandwidth policy.
2. Select the Limited Traffic mode, set IP Range as all, set Port Range as TCP: 21, set Limited Speed as 0KB/s.
Afterwards, ftp download will not be allowed to employees during working time.
Please note that: Bandwidth Policy is available only for the computer, but invalid for the user.
| Alert Policy | Back to Index | Network Policy (Advanced) |