Nowadays, most employees may use internet during their working time and website visit is one of most fundamental online activities. When employees update their website contents, publish press releases, take part in forum discussion, search keywords for solutions or promote products on video sharing sites such as YouTube, Metacafe and social networking sites such as Facebook, Twitter, LinkedIn and so on, they visit websites. However, according to an online survey, almost all employees may spend some time on browsing some websites such as news, YouTube videos, online games, online shopping, porn websites, etc, which are totally irrelevant to their work during working time. Some of the employees may visit malicious websites which include malware and bring harm to their PC or even office network.
Now, you can understand that why more and more IT managers or employers are trying to find internet filters which can help them to block websites. SurveilStar's Website Policy function is the ideal solution for website blocking.
After deploying SurveilStar Agent on users' computers, IT manager can create an Website Policy and flexibly manage and control employees' website visit. Before creating Website Policy, we recommend you sort websites into classes by menu 【Categories > Websites】.
SurveilStar's Website Policy is applicable to all browsers including Internet Explorer, Firefox, Google Chrome, Safari, Opera and many others.
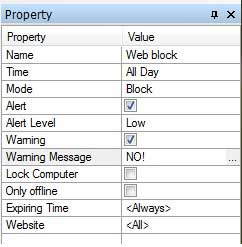
In SurveilStar Console, click menu 【Policies > Website】, click Add button to create a Website Policy. Then you will see Property panel on the right as the picture below. In the following example, you can see that all websites are blocked in all day, alert and warning message are also set for administrator and users.

| Properties | Value |
| Name | Give your website policy a name like blocked-sites. |
| Time | Set effictive time for your website policy. |
| Action | Select policy execution action. Allow, Block and Ignore are available. |
| Alert & Alert Severity | Enable or disable alert on SurveilStar Console if any PC tried to break the policy. Choose alert severity if Alert is enabled. Low, High and Critical are available. |
| Warning & Warning Message | Enable or disable warning message to show on agent PC. Set warning message if Warning is enabled. |
| Lock Computer | Check this option to lock agent PC if the policy matched. Then user can't do anything on this client computer. IT manager can unlock the PC via menu 【Control > Unlock】 on SurveilStar Console. |
| Take effect while offline | Check this option if you want the policy to be effective only when the PCs are offline. |
| Expiration Time | Check and apply this option to set expiring time for the policy. |
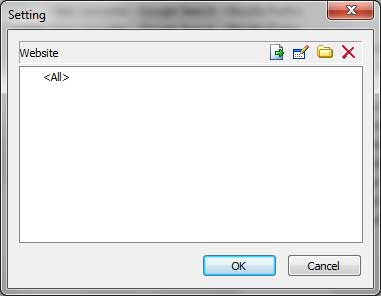
| Website | Click |
Click ![]() button to specify application. There are 3 methods.
button to specify application. There are 3 methods.

There are four buttons in the dialog which are Import, Add, Application Classes List and Delete. It's just the same as the setting dialog that was previously discussed in Web Logs chapter. Please check Web Logs for more information.
In order to prevent staff from accessing to illegal websites, website browsing policy can be set up to put a ban on or only allow to visit the specified websites. If it is only some specified sites that you need to be allowed to, a set of strategies is a good choice. This is an example which can help you better understand Website Policy.
The requirement is that when employee is on work, only some work-related websites are allowed to visit. To achieve this, you can create two web policies like below.
1. Create a Website Policy and set all websites to Block.
2. Create another Website Policy, and add specified websites to Allow.
Afterwards, only some designated websites are allowed to visit.
| Application Policy | Back to Index | Screen Snapshot Policy |