How to Uninstall SurveilStar Agent from Client Computer
Many company allow employees to use instant message program to communicate, however, employees may send instant messages which are not related to their work, or even leak out a business secret. According to a research, most companies which use instant messages will also track instant messages in case something unexpected happens.
Features
- Take Screen Snapshots
- Email Monitoring
- Instant Message Monitoring
- Website Visit Monitoring
- Application Monitoring
- Document Monitoring
- Printing Monitoring
- Network Monitoring
- Computer Maintenance
- Data & User Management
Resources
- Complete Online Guides
- Video Tutorials
- SurveilStar Testimonials
- Deploying SurveilStar
- SurveilStar Home Edition
- Free Activity Monitor
- Free Email Recording
- SurveilStar Press Release
- Version Comparison
- Feature Module Comparison
- 日本語
- français
Topics
There are two methods to uninstall SurveilStar monitoring Agent.
Method 1: Uninstall Agent from SurveilStar Console Details ...
Method 2: Uninstall Agent from the client computer
If the client computer is offline or out of control of SurveilStar Console, you can uninstall the Agent directly from the computer.
Step 1: On client computer - create Operate Code
1. On the desktop of Windows, click "Start > Run", type "agt3tool ocularadv" command into the run box
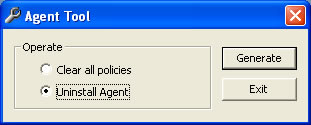
2. Run the command, and you will see the Agent Tool.

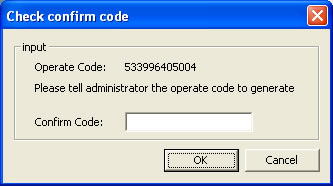
3. Select Uninstall Agent, and click the Generate button, you will see the Check Confirm Code form. This code is used to generate a confirm code from the Console (see next step).
Note: DO NOT close this Check Confirm Code form in this step. You need to return to this form later.

Step 2: On SurveilStar Console - create Confirm Code
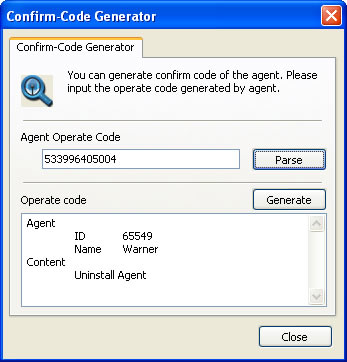
1. Go to SurveilStar Console, click the menu "Tools > Agent Tool > Confirm-Code Generator", you will see the Confirm Code Generator, enter the Operate Code attained previous step into the Agent Operate Code text area

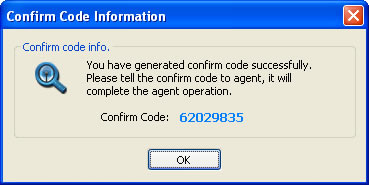
2. Click the Parse button, and then click the Generate button, you will see the Confirm Code highlighted in blue colour in a result form. Write down this code, and go to the last step.

Step 3: Back to client computer - complete the un-installation
Now we are back to the client computer, where the uninstall operation is waiting to be confirmed.
Go to the Check Confirm Code form, enter the Confirm Code, and then click the OK button. Done.
Note: Uninstalling a Agent does not delete the history data of this computer. The uninstalled Agent will still appear in the Console, marked in dark gray colour. To delete an Agent completely, please click the Console menu "Tools > Computers" , select the computer name, and then click the Delete button.
